Ghost Mannequin Photography: How to Shoot and Edit It
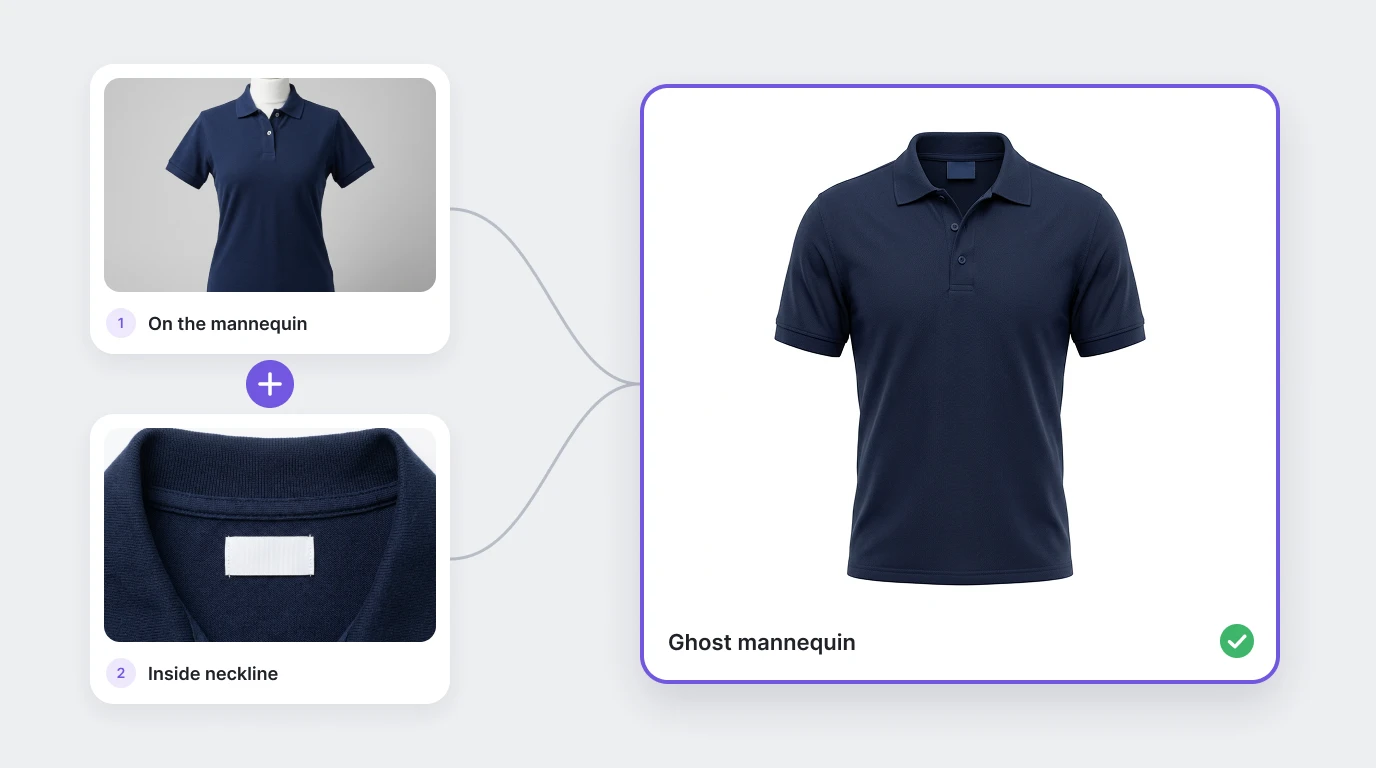
Ghost mannequin photography makes a garment look as if an invisible person is wearing it. You shoot the garment on a mannequin, shoot the parts the mannequin hides, then combine the two in editing. Done well, it shows shape and fit without the cost of a model, which is why it is the standard look for apparel product pages.
What a Ghost Mannequin Image Is, and Why Stores Use It
A ghost mannequin image (also called invisible mannequin, hollow man or 3D ghost mannequin) shows a garment holding its three-dimensional shape with the mannequin edited out. You see the neckline, the inside of the collar and the way the body falls, but no form and no person.
Stores use it for three reasons:
- It shows shape. Shoppers can see how a jacket or dress sits on a body, which a flat lay cannot show.
- It keeps the focus on the product. No model means nothing competes with the garment, and every product in a category looks the same.
- It costs less than on-model photography. You pay for a mannequin and some editing, not for models and studio days.
It is accepted on most marketplaces. Amazon's apparel rules, for example, allow ghost mannequin images but not a visible mannequin on the main image. Our Amazon US image requirements guide has the details.
What You Need
You do not need a studio. You do need the same setup for every product, so the photos match.
| Item | Why it matters | Budget option |
|---|---|---|
| Mannequin with removable parts | A detachable neck, chest plate and arms let you show the inside of the garment | A standard form, with the garment turned inside out for the second shot |
| Camera on a tripod | The two shots must line up exactly | A recent phone on a tripod, with exposure locked |
| Two lights with softboxes | Even, soft light shows fabric texture without hard shadows | Large window light, shot at the same time of day |
| White or light gray backdrop | Makes the cut-out easy and gives a clean background | Seamless paper or a white wall |
| Steamer, pins and clips | A creased or baggy garment looks wrong however good the editing | A travel steamer and bulldog clips |
| Editing software | You combine the shots and remove the mannequin | Photopea or GIMP, both free |
How to Shoot a Ghost Mannequin Image
Plan two or more shots per view: the garment on the mannequin, and the inside areas the mannequin covers.
Prepare the garment. Steam it, remove tags and loose threads, and lint-roll dark fabrics. Every crease shows when a shopper zooms in.
Fit it to the mannequin. Use a form the same size as the garment. Pin or clip excess fabric at the back so the front silhouette sits cleanly, and pad the form if the garment hangs loose.
Lock the camera. Put the camera on a tripod and set exposure, focus and focal length manually. Mark the mannequin's position on the floor with tape so nothing moves between shots.
Light it evenly. Place two softboxes at about 45 degrees either side, at the same height and power. Light the backdrop slightly brighter than the garment so the edges separate cleanly.
Shoot the front and back. Shoot the front, then turn the mannequin to show the back. Keep the same camera position and settings.
Shoot the inside. Remove the neck or chest piece and photograph the inside of the back neckline, including the label, at the same angle and light. If your form has no removable parts, turn the garment inside out on it, or lay the neckline flat and shoot from above.
Shoot the details. Fabric, buttons, stitching and labels, framed the same way for every product in the category.
How to Edit a Ghost Mannequin Image
Editing is the slowest part of the job, and the part most stores outsource. The steps are the same in Photoshop, Photopea or GIMP.
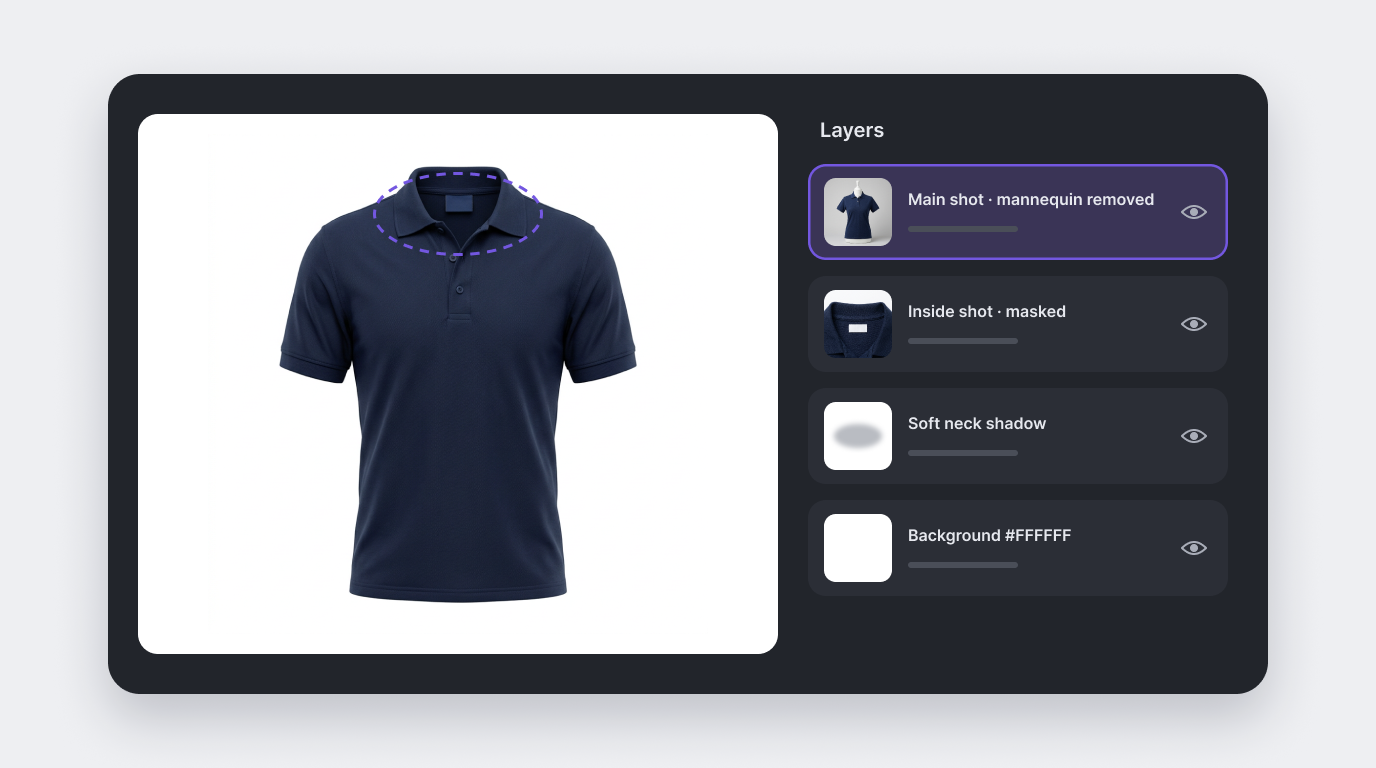
Stack the shots. Open the main shot and the inside shot as layers in one file, with the main shot on top.
Cut out the garment. Select the garment in the main shot with the pen tool or a subject selection, then remove every visible part of the mannequin: neck, shoulders, armholes and waist.
Place the inside shot. Move the inside shot under the garment, then scale and rotate it until the inner neckline lines up with the opening. Mask it so only the inside of the collar shows.
Match light and color. Adjust brightness and color on the inside layer until it matches the outside. A small, soft shadow inside the neckline adds depth.
Clean the edges. Zoom in on the neck, shoulders and armholes and fix any rough or haloed edges. These are the first places a fake looks fake.
Set the background and export. Place the garment on pure white (#FFFFFF) for marketplaces, or your brand background for your own store. Export a full-size master, then each channel's size from it.
The full process for getting a clean white background is in our guide to white background product photography.
Tips for Different Garments
The method is the same for everything, but each garment type has its own problem area.
- Shirts and polos: button the top button or fold the collar exactly as it sits when worn, and shoot the inside back collar separately. The collar is where shoppers look first.
- Knitwear: knits stretch on a form, so use a size that fills the garment without pulling the stitches. Steam gently so the texture stays visible.
- Jackets and coats: shoot open and closed if both matter. Fill the shoulders properly, because a collapsed shoulder makes a structured jacket look cheap.
- Dresses: use a full-length form, or hang the dress from the form with the hem falling naturally. Shoot the inside neckline and, for strapless styles, the inside of the bodice.
- Trousers and skirts: use a lower-body form or hang them by the waistband. Shoot the inside of the waistband so it reads as open rather than flat.
- Hoodies: arrange the hood so its shape shows, and photograph the inside of the hood as the second shot instead of the back neck.
Common Mistakes That Give It Away
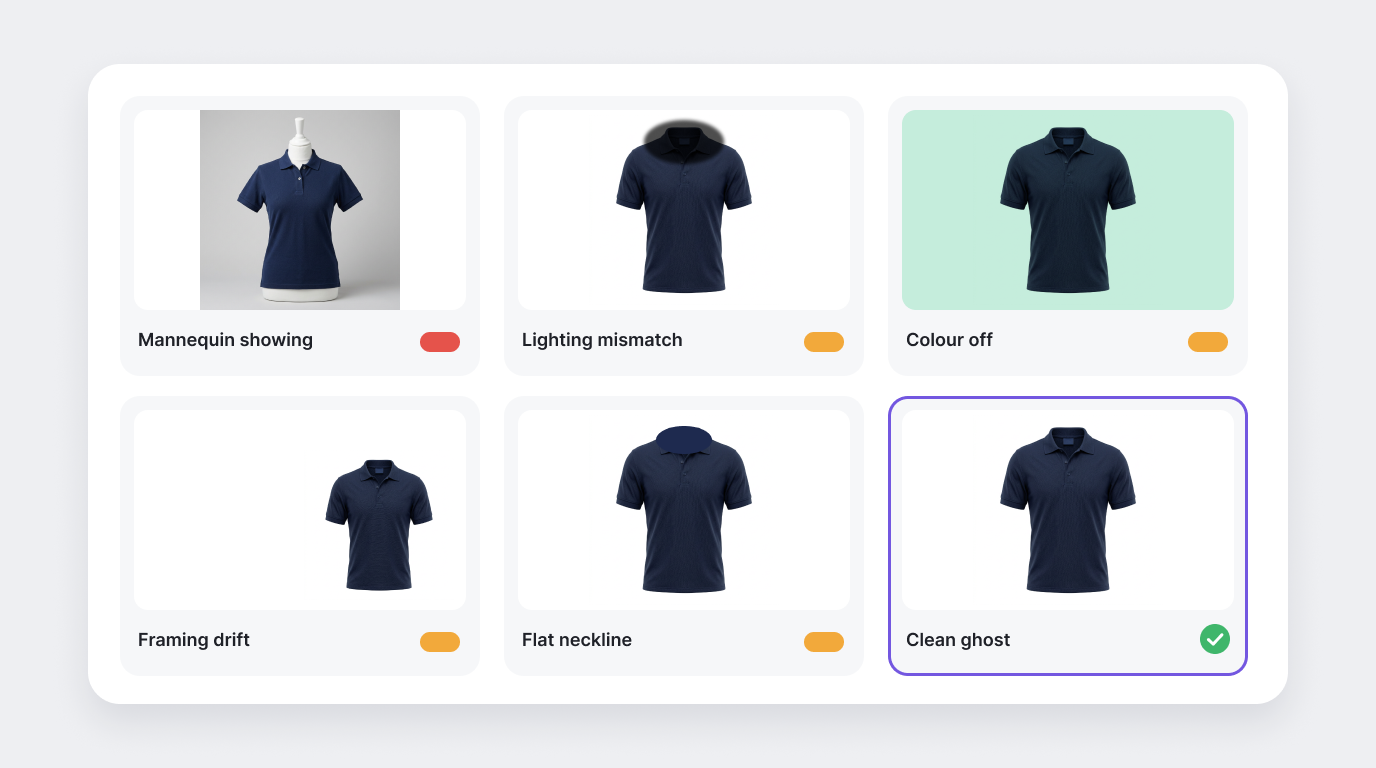
- Bits of mannequin left at the neck, shoulders or armholes.
- Different lighting on the two shots, so the inside looks pasted in.
- An inside shot taken from a different angle, so the neckline looks twisted.
- The wrong size form: too small and the garment sags, too big and seams pull.
- A flat, shadowless neckline that reads as a cut-out.
- Framing that changes from product to product, so the category page looks uneven.
- Colors that do not match the real garment, which leads to returns.
When to Use Ghost Mannequin, and When Not To
| Works best for | Less useful for |
|---|---|
| Tops, shirts and knitwear | Accessories, bags and jewelry |
| Jackets and coats, where structure matters | Very soft or sheer pieces that will not hold a shape |
| Dresses and jumpsuits | Swimwear and lingerie, which usually sell better on a model |
| Trousers and skirts, shown with the waist open | Items where fit on a body is the main question |
Most stores mix styles: ghost mannequin or flat lay for every product, and on-model for the main image or hero styles. Our guide to clothing product photography compares the three.
DIY, Retouching Service or AI
Once you know the method, the question is who does the work.
| Approach | Works well for | Trade-off |
|---|---|---|
| DIY shoot and edit | A small catalog, and a team with editing skills | Every product takes shooting and editing time |
| Shoot yourself, outsource the editing | Steady volumes where editing is the bottleneck | You pay per image and wait for each batch |
| AI from your existing photos | Large catalogs, or new styles every week | Needs a clean source photo, and every output should be checked against the real garment |
Photogenix produces 3D ghost mannequin shots and flats from your source files. You upload a garment image and generate ghost mannequin outputs with the background you choose, in bulk. Brand guidelines are set up once and every image is checked against them, so the thousandth image matches the first.
Try Photogenix free on a few garments you have already shot, or add the Photogenix app for Shopify to your store.